
Risk is a fact of life, and there’s no way to eliminate it entirely. No matter what we do, there’s always the chance that something could go wrong. However, we can manage the risks we face by making thoughtful plans and being prepared for anything that might happen.
Introduction #
Risk is a fact of life, and there’s no way to eliminate it entirely. No matter what we do, there’s always the chance that something could go wrong. However, we can manage the risks we face by making thoughtful plans and being prepared for anything that might happen. That’s why it’s so important to have a risk management plan in place before you undertake any activity or event. By taking the time to assess the risks beforehand, you can make sure that you’re as prepared as possible for whatever might happen. And if something does go wrong, your risk management plan will help you to quickly and efficiently address the problem. So don’t forget – a little planning can go a long way towards keeping everyone safe and ensuring a successful event.
We know that young people learn best by doing, and that’s why we believe in providing activities that encourage their development. By taking on new challenges, young people can develop a sense of confidence and accomplishment. At the same time, we recognize that not all activities are appropriate for all young people. We want to provide excitement, but not danger; adventure, but not hazard. That’s why we carefully select activities that strike the right balance for each individual. And it’s why we always put safety first. By providing the right mix of challenge and support, we can help every young person reach their full potential.
No activity is without risk, but by assessing risk we can minimise the likelihood of something going wrong. Assessing risk starts in the early stages of activity planning and goes on throughout the activity until all participants go home at the end of the activity. This may seem like a lot of work, but it’s important to consider all the potential risks before starting an activity. By embedding risk assessment within the planning process, we can deliver safe, enjoyable and exciting programmes for young people. By taking a few simple precautions, we can make sure that everyone has a great time while staying safe.
There are five simple steps. If you’ve done risk assessments elsewhere, these should look familiar.
Feedback #
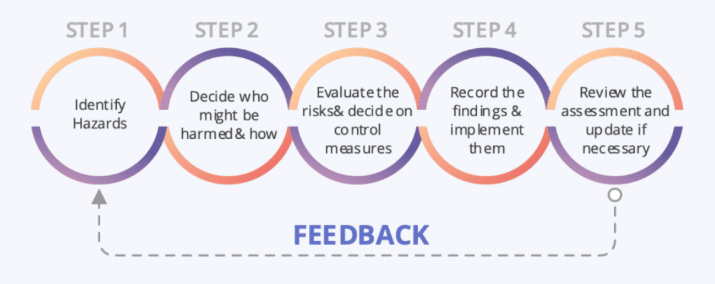
Look for the hazard #
A hazard is anything that could cause harm. It could be cables across the floor, a slippery or uneven surface, or the weather – these are all unsafe conditions. Unsafe acts could be a hazard as well.
Make sure you look at all your activities, including non-routine tasks. Talk about it with others in the leadership team. Look at what actually happens rather than what should happen. Look for the hazards which are really obvious, not every single little thing.
Who might be harmed and how #
Who is involved in the activity – young people, adult volunteers, visitors? What could happen to cause them harm?
Young people might not recognise a hazard, especially younger members or those with additional needs. Teenagers are also more likely to take risks, so we need to be aware of how they perceive risk in order to help keep them safe. Similarly, younger grous, will require more supervision.
Some people might simply have got used to a hazard being present and adjusted how they behave around it, but visitors might not know that the hazard is present. Think about that heavy entry door – those who come through it every week know how it closes but new visitors won’t be aware. Think about how this could be kept open; use signs to make people aware or supervise the entrance.
Adults are often very good at identifying hazards that might hurt young people but can sometimes forget to look after themselves. We also find that adults sometimes do things which they’re not used to, which can result in injury (perhaps we’re not as flexible or strong as we think we are!).
Once you’ve identified who might be harmed you need to think about how someone may be harmed. Someone falling from a wall will be injured differently depending on how high the wall is or what surface they land on – this is the how.
Knowing who may be harmed and how they may be harmed means you can now think about what the risk is. Risk is the chance of someone being harmed by a hazard. For example, walking along a wall a foot from the ground has little risk, but walking along a six-foot wall with no railings has a high risk of harm.
How are the risks controlled #
Controls are ways of removing or reducing risk. When deciding how risks are going to be controlled, it’s useful to work through the following questions, in this order:
- Can the hazard be removed entirely?
- Is there a less risky option?
- What can be done to reduce the risk of people being in contact with the hazard?
- What instructions and supervision are needed?
- Is protective or safety equipment available to reduce risk?
Always start at the top of this list, if you can remove a hazard entirely. That is always the best, but if this is not possible then explore the other options in order.
Think about any special considerations or controls needed for those with additional needs (physical, mental, cultural etc).
When considering these questions, you should also consider what’s reasonably practicable. Don’t just simply go for the quickest or cheapest option but think about what would be reasonable for you to put in place like a control in the setting you are operating in.
Never be afraid to change or stop an activity if the risk increases.
Record and communicate #
Just thinking about a risk assessment isn’t enough. It needs to be recorded, this could be documented usually on paper in a structured format but can be updated on our operating app (Coordinate).
The key is that the method you choose allows for it to be shared with the other adults and young people involved (communicated).
Documenting it helps you think through all the steps and is easier to review when you next do a similar activity. It also makes sure that what you’ve decided to do is clear and well communicated.
Think about:
- How do you involve others (adults and young people) in doing and documenting the risk assessment?
- How will you inform them about the risks identified and the controls in place to keep them safe?
How and when to risk assess
There are lots of options for this which we’ll work through now.
- Site Managers, Regional Managers and Accounts Managers must make sure that risk assessments are documented for all premises which they own or operate. Leaders need to make sure that they have access to these premises’ risk assessments, whether that’s your weekly meeting place or the activity centre you’re staying at for the weekend, because they’ll include things which will help with the development of your activity risk assessments.
- There are lots of activities in your programme that you do all the time: it could be the arrival, start, end and departure of your meeting or the standard way you run cooking or crafts activities with your section.
- Once you have assessed these, documented the risks and control measures and then communicated them to all involved, you may not need to reassess or review them every time you repeat the activities.
- However, you do need to watch out for changes that might require a review and update. Also, you will need to remind everyone as often as necessary otherwise they will soon forget. Ensure new people know what is expected before they take part.
As you’re doing these activities regularly you should be aware of the hazards, risks and controls. This means you may not need to get the actual document out each time. Simply work through the usual controls and think through what you are doing.
If you need to change things, take the additional risks identified into account before you do and make sure you communicate any changes to all involved. If you need to do that on the spot it’s called a dynamic risk assessment. Afterwards, consider if your documented risk assessment needs updating and update it if required.
There will also be bigger or more adventurous activities or those you do less often. Make sure a risk assessment is done before the activity takes place and that it’s documented. This is likely to include nights away activities, trips and outings. It doesn’t mean that you will have to start from scratch. Using previous event risk assessments as a starting point to build on is always a handy tip.
Ways of recording a risk assessment
There are lots of ways of recording your risk assessments: We have an online template but you could also try annotating your activity instructions sheet, making notes on a phone, using an online risk assessment tool, or an audio recording would be acceptable if members are not able to record their risk assessment in writing.
It’s about finding something that works for you and your team. Just be sure that you can show you’ve worked through the five steps and have communicated it with others.
For example, if you manage your programme using our operating app (Coordinate) you can record your risk assessments there and these will be available to other leaders. There are some example risk assessment templates and tools available. Whichever method you choose, make sure you date your risk assessment, and show who was involved in it and when this will be reviewed.
Communicate and explain to others
Don’t just keep this information to yourself; it’s important to tell others about what you’ve done and what measures are in place to keep activities safe.
We’ve talked about sharing risk assessments with young people. Involving young people in keeping activities safe is really important. We know young people learn by doing activities that teach them Skills. Regardless of who’s involved, everyone should feel that they can stop an activity if they feel it’s unsafe. For example, an adult could raise their concerns with another adult, or young people in an archery session could be taught to shout ‘Stop!’ if they see anyone breaking the rules.
Briefing young people about the risks will help them to stay safe and to learn. With younger members, it can be as simple as explaining not to run with scissors and why, and how to hold them correctly and safely. Helping all others to understand the risks of an activity, and what makes them a risk, will be more beneficial to all than simply saying ‘don’t!’
If your plans change at the last minute, make sure you discuss them with all others involved so they understand what’s changed to make the activity safe.
Ideas for ways of sharing your risks and controls
- Team planning meeting – discuss at leader meeting, helping you to put the assessment and controls together by those taking part. Increases understanding and ownership.
- Team Briefing – for all adults at the start of a camp. Includes those who may not be regular members of the team and parents helping for the first time. Cover off the controls and the reasons behind them.
- Camp Rules – time planned to explain rules (and reasons behind them) at the start of a camp to young people with leaders present.
- Examples such as advising young people to be careful near the wood pile and reminding them to wear strong boots and gloves to avoid injury, explaining to them about the nails and splinters. Any control measure should be simple to communicate.
Review and revise plans where needed #
Responsibilities #
HQ – Training #
At Adventure Camps, we understand that safety is of the utmost importance. That’s why we provide comprehensive training for all adults, including support in undertaking risk assessments for site managers. This training is reinforced in other, more specialised modules, ensuring that everyone has the knowledge and skills necessary to keep themselves and those around them safe. With our help, you can create a secure environment for all.
Site Managers #
Working with children and young people can be incredibly rewarding, but it is also essential to remember that it comes with a significant amount of responsibility. As a site manager, it is your responsibility to ensure that all adults working with children have the necessary training for their role. This includes understanding how to create a safe environment, identify potential risks, and respond to safeguarding concerns. Leaders also have a responsibility to ensure that young people understand the risks and how to stay safe. This may involve activities such as risk assessments, first aid training, or fire drills. Importantly, everyone has a responsibility for their own learning and development. If you feel that you need more support or assistance, it is essential to reach out to someone who can provide help. By working together, we can create a safe and enjoyable environment for everyone involved.
Leaders #
All activities require a leader in charge. This is someone who makes sure that key tasks are completed. The Management team are responsible for identifying and agreeing on the leader in charge for each activity.
Community #
Keeping our community safe is a joint effort that requires the cooperation of everyone. Adults have a responsibility to set the tone and lead by example, but it is also important to involve young people in the effort. They can play an active role in keeping themselves and others safe by speaking up if they see something that doesn’t seem right. We all need to work together to create a safe environment where everyone can thrive. By cooperating and playing our respective roles, we can make our community a place where everyone can feel welcome and secure.
Guidance for Supervision #
Background #
Within Adventure Camps we aim to develop skills for life, this includes young people learning about risk management and independence. Keeping young people safe whilst allowing them freedom can be challenging to balance, and we see a large number of incidents occur when young people are away from direct supervision of leaders.
This guidance is designed to provide leaders with some suggestions of how to manage these activities in order to reduce the potential for incidents and injuries
Types of supervision #
There are three types of supervision: direct, indirect and remote. When planning your activities you need to choose the type of supervision, but don’t forget to always maintain your required ratios.
When considering the type of supervision to be used with young people, the following factors should be taken into account:
- Age – Minis and Juniors will require more direct supervision than Explorers.
- Competence – The level of experience of the young person completing this activity.
- Activity – Some activities, which have a higher risk level will always have direct supervision.
Direct Supervision #
A leader with a group of young people working on the same activity. This will include a lot of things you will see in general activities, like helping Juniors to cut out a template, cooking activities with younger members or supervising a more adventurous activity like archery, climbing etc.
Indirect Supervision #
A leader instructs the young people in the activity, but may then leave them to complete tasks themselves. With this type of supervision the leaders must still be on hand to assist if needed, so an example would be Cooking. Before the activity begins the equipment would be checked by the leader. The young people would be briefed on what the activity is, told how long they had, how to use the equipment, and given a set of instructions. The leader would check their understanding. The leader would then leave them to do the task themselves but be close enough to observe in general what was going on and would be aware of what issues may crop up that would require intervention – for instance be able to spot where behaviour may become an issue. Where there are younger children who have not used the equipment before, or anyone with additional needs who requires assistance, the leader would be on hand to help at different stages of the activity.
Wilds, at camp, collecting firewood. Before the activity they would be told where the boundaries are, and what they can do, collect dead wood only, not climb trees and their understanding would be checked. The leader could have an agreed signal such as a whistle, which, when heard, meant they had to come straight back. The Juniors would be out of sight, but with a clear set of boundaries, for a limited time and an agreed signal.
Junior Explorers visiting the park, using the play ground equipment. The Junior Explorers would be told what equipment they could use and what the boundaries are (not to leave the play area). The leader would check that they had all understood, and would remind them about sharing and general behaviour expected. The leaders may then watch from a bench, but have an overview of what they are doing and intervene if there were issues such as pushing or squabbling before it resulted in an injury.)
Remote Supervision #
This is often where peer-led activities with Wild and Senior Explorers will fit, the leader will help with the planning and preparation and will put in place a supervision plan to ensure that the group is monitored and supported and there are systems in place to make contact between the group and the leader. Remember with this the leader is still responsible for the group so they need to have clear systems in place as well as the confidence in the groups abilities to stay safe and stick to the plans. Remote supervision is most suited to Wild and Seniors and will often be used to enable independent sessions as well as peer led activities.
Safety Checklist #
The Safety Checklist is aimed to help all Managers and Activity Leaders working with young people to fulfil their role and responsibilities in managing and supporting safety in United Education.
Children’s activities should be safe, but they should also be enjoyable. A large part of safety is about being organised, asking the right questions and doing things that will help safety without taking away a sense of adventure appropriate to the age group. This is a straight-forward checklist of common hazards that will help you assess the risks for your activity and put suitable controls in place.
Organise your programme #
- Check Adventure Camps policies and procedures
- Check activity guidance and processes for delivery
- Check whether further insurance is required
- Check whether HQ needs to notify
- Make sure all activities are approved in accordance with Rules and Policies
Leader in charge #
Children activities need a leader to be in charge and overseeing the activity. This includes responsibility for registers, headcounts, allocation of roles to specific adults and checking they are aware of their specific responsibilities. The best way of doing this is for all adults who will be involved in the activity to agree which one of them will take on this role. This arrangement ensures that there is always an adult present who is responsible for the safety of the children and the smooth running of the activity.
Note: the agreed leader in charge does not have to do all of this themselves, but they are responsible for ensuring that others undertake these tasks.
Putting Safety on the agenda #
- Make sure you understand how and when to record and report incidents and accidents.
- Discuss safety at events, activities, camp planning meetings and reviews.
- Give young people and adults appropriate training, guidance or rules.
- Support others in the team to gain training and improve knowledge of safety.
Checklist #
The following quick checklists are a helpful starting point when planning and at the start of an activity. Add any additional hazards as appropriate to your location. They are not intended as a substitute for doing and documenting a risk assessment. Make sure your risk assessment is clear; communicate it to other adults and share relevant parts with young people.
Indoor and outdoor games #
Identify a leader in charge who understands the tasks they are responsible for making sure are done
Have a system in place for handover of young people between parents and carers and leaders
Have a suitable supervision plan – including free time and unstructured activities
Make sure everyone understands boundaries and limits
Make sure everyone understands rules
Make sure games are suitable for age and ability of participants
Monitor behaviour of young people to make sure it remains suitable for the activity
Keep equipment in good order
Reduce tripping or slipping hazards
Minimise potential for falls on solid or sharp objects and glass
Have a plan for what to do in an emergency
Have medical and health details available
Have a first aid kit and trained first aider available
Think! What are the other hazards?
Outings and visits #
Identify a leader in charge who understands the tasks they are responsible for making sure are done
Have a system in place for handover of young people between parents and carers and leaders
Have a suitable supervision plan – including free time and unstructured activities, headcounts, and check-ins
Have a procedure in place in case a child becomes separated from the group
Provide adequate supervision – including ratios
Identify natural hazards including water
Monitor behaviour of young people to make sure it remains suitable for the activity
Have a plan for what to do in an emergency
Have medical and health details available
Have an emergency phone available
Have a first aid kit and trained first aider available
Think! What are the other hazards
If you have a vehicle…
Have a safe area for embarking and disembarking
Use vehicles with seat belts and child restraints fitted and make sure these are used
Identify susceptibility to travel sickness
Check vehicle insurance covers the outing
Make sure the driver is suitably qualified to drive that vehicle
Have appropriate supervision while travelling


